


How to Disable Metered Connection in Windows 10?

If you're a Windows 10 user and you're looking for a way to disable the metered connection, then this is the article for you. We'll take a look at what a metered connection is, why you might want to disable it, and then walk you through the simple steps of how to disable it in your Windows 10 device.
By the end of this article, you'll be able to enjoy unlimited internet access without having to worry about being charged extra for exceeding data limits. So let's get started!
How to Disable Metered Connection in Windows 10
- Open Settings by pressing Windows key + I
- Navigate to Network & Internet, then go to Wi-Fi.
- Select Properties of the connected Wi-Fi connection.
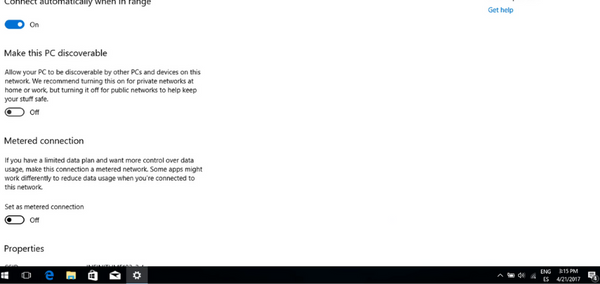
- Scroll down and toggle the Set as metered connection switch to Off.
What is a Metered Connection in Windows 10?
A Metered Connection in Windows 10 is a type of connection where you pay for the data you use as you use it. This means that your Internet Service Provider (ISP) can charge you additional fees for data usage over your monthly data allowance.
This is especially important for those who have limited data plans, as they need to be careful to not exceed their data allowance. Windows 10 is designed to save data usage, so when you connect to a Metered Connection, Windows 10 will adjust its settings to conserve as much data as possible.
This can include reducing the amount of data used for automatic updates, reducing the amount of data used for live tiles, and limiting the amount of data used for background data.
How to Disable Metered Connection in Windows 10
Disabling the Metered Connection in Windows 10 is relatively easy. Here's how to do it:
Step 1: Open Settings
To begin, you'll need to open the Settings app. You can do this by clicking on the Start button, then selecting the Settings icon.
Step 2: Go to Network & Internet
Once you're in the Settings app, you'll need to select the Network & Internet option. This will open up a list of options, including Wi-Fi, Ethernet, Data Usage, and more.
Step 3: Select Wi-Fi
Once you're in the Network & Internet settings, you'll need to select the Wi-Fi option. This will open up a list of available networks that you can connect to.
Step 4: Select Advanced Options
Once you have selected the Wi-Fi network you want to connect to, you'll need to select the Advanced options. This will open up a new window, where you can adjust the various settings for your connection.
Step 5: Turn off Metered Connection
Once you are in the Advanced options, you'll need to locate the Metered Connection option. This option should be turned off, so you can make sure that Windows 10 does not limit the amount of data it uses. Once you have turned off the Metered Connection, click on the Save button to save your changes.
Step 6: Connect to Wi-Fi Network
Once you have disabled the Metered Connection, you can now connect to the Wi-Fi network you selected. You should now be able to use unlimited data without having to worry about any additional charges.
Top 6 Frequently Asked Questions
What is a Metered Connection?
A metered connection is a type of data connection used for internet access that charges the user based on the amount of data used. The data usage is monitored and the user is billed according to the amount of data used.
This type of connection is often used in areas where there is limited or slow internet access. Metered connections are not new and have been used for many years with mobile data plans.
What are the Advantages and Disadvantages of a Metered Connection?
The main advantage of a metered connection is that it allows users to keep track of their data usage and budget accordingly. This can be especially useful in areas with slow or limited internet access.
The downside of this type of connection is that it can be expensive, as users are charged for the amount of data used. Additionally, some features may not be available when using a metered connection.
Why Should I Disable Metered Connection in Windows 10?
By disabling metered connection in Windows 10, users can ensure that they are not charged for any data they use while browsing the internet. This can be especially useful if users are in an area with slow or limited internet access.
Additionally, disabling metered connection in Windows 10 can also help ensure that certain features, such as Windows Update, are available.
How Do I Disable Metered Connection in Windows 10?
To disable metered connection in Windows 10, open the Settings app and select the Network & Internet option.
Then, select the Wi-Fi option and click on the network that you are currently connected to. Finally, toggle the Set as metered connection switch to Off.
What Happens After Metered Connection is Disabled in Windows 10?
After metered connection is disabled in Windows 10, users will no longer be charged for any data they use while browsing the internet.
Additionally, certain features, such as Windows Update, will become available. It is important to note that disabling metered connection in Windows 10 does not guarantee faster internet speeds.
Are There Any Other Considerations When Disabling Metered Connection in Windows 10?
Yes, it is important to note that disabling metered connection in Windows 10 does not guarantee faster internet speeds.
Additionally, some features may be limited or unavailable when using a metered connection, so users should ensure that they are aware of any potential limitations before disabling the metered connection in Windows 10.
How to Enable or Disable a Metered Connection in Windows 10 - QUICK AND EASY!
If you find that your internet connection is being throttled by Windows 10, disabling the metered connection can help. The steps are easy to follow and will make sure that your internet connection is not being hindered in any way.
With the metered connection off, you can enjoy your internet connection without having to worry about any potential limitations or restrictions.